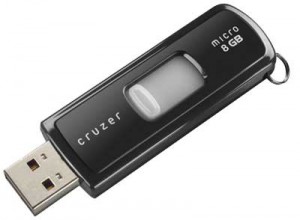
The only thing you need for this cool trick
This tutorial show you how to back up your fit-PC2 workstation so you can quickly and easily restore your computer to its original state in the event of a hard drive failure, or infection by a trojan or virus.
This technique will work for any USB-bootable computer that supports a hard drive, including the fit-PC3 and Intense PC.
The procedure involves creating a new Linux partition on your existing hard drive, and backing up your workstation installation into this space (and also onto a USB thumb drive).
Once you have set your machine up, the back up process is quick and easy, and works for both Windows and Linux workstations.
All you need is a USB thumb drive and some free software packages.
This method is not suitable if you save most or all of your files onto your local computer, rather than onto a network drive.
Please note
We supply these instructions, links and files for your convenience and make no promises about their suitability for use.
We don’t provide technical support for these instructions, and can’t assume any responsibility for any problems that you encounter in attempting to use them.
If you’re not sure what you’re doing at any point, please stop and ask your technical adviser for assistance.
You have been warned. Good luck!
Step 1. Create a bootable Linux thumb drive
Before you panic, there is a ready-made Linux image available to use on our website.
It is 256MB, so will fit on practically any USB drive available. However, we recommend you use the biggest drive you can find, at least 8GB or larger. At a pinch you might get away with 4GB,
but only if your operating system is fairly cut-down.
To copy the image onto the USB drive, use dd (under BSD/Linux) or physdiskwrite under Windows. Physdiskwrite is available from http://m0n0.ch/
In Linux/BSD:
gunzip -c backup_fitpc2.img.gz |dd of=/dev/sda bs=4m
Substitute sda for the appropriate disk, e.g. sdc, sdd or sde (whichever corresponds to your USB thumb drive), or you will be very sad.
To get a list of available disks, type:
fdisk -l
Choose the disk that matches the size of your USB thumb drive.
In Windows:
Open a DOS command window, then go to the directory with physdiskwrite.exe and the image file in it and type:
physdiskwrite -u backup_fitpc2.img.gz
Then select the appropriate device number.
Note: This is usually the highest one offered, and it is never 0. You have been warned!
Step 2. Boot your fit-PC2 from the USB drive
For a start, just insert the thumb drive in one of the USB connections and restart the fit-PC2.
If it still boots into Windows, reboot again and press “F2” to go into the BIOS and change the boot order (under the “Boot” menu), so that it boots from the USB drive first.
Step 3. Login to Linux
Once you get a login prompt, the user name is “root”, and the password is “yawarra”.
Step 4. Create a new partition on the USB drive
Because the image file used is only 256MB, the rest of your USB drive is still empty. It can be used to store backups, but before we can do that, we have to create a new partition. We do this using fdisk.
If all has gone as expected, your internal hard disk is /dev/sda, and the USB drive is /dev/sdb.
So, to add a new partition to the USB drive, we type:
fdisk /dev/sdb
“n” for a new partition
“p” for primary
“2” partition number
Accept the defaults for the start and end of the partition (this will give you the maximum
available space for your backups).
“w” to write the new partition table and exit fdisk
Step 5. Reboot
Next we reboot Linux to give it a chance to recognise the new partition.
Normally this wouldn’t be necessary, but we have just changed the partitions on the primary disk that contains the current running operating system, so sometimes it can get confused if we don’t restart.
reboot
Step 6. Create a new filesystem and mount it
Once restarted, login again, then type:
mkfs.ext2 /dev/sdb2
mount -a
Your shiny new partition is now available in the /backups/usb directory.
Step 7. Figure out how big your current install is
At the command prompt, type:
ntfsresize -i /dev/sda1
This will give you output something like:
fit-PC2-backup:~# ntfsresize -i /dev/sda1
ntfsresize v2.0.0 (libntfs 10:0:0)
Device name : /dev/sda1
NTFS volume version: 3.1
Cluster size : 4096 bytes
Current volume size: 83889594880 bytes (83890 MB)
Current device size: 83889598464 bytes (83890 MB)
Checking filesystem consistency …
100.00 percent completed
Accounting clusters …
Space in use : 5045 MB (6.0%)
Collecting resizing constraints …
You might resize at 5044670464 bytes or 5045 MB (freeing 78845 MB).
Please make a test run using both the -n and -s options before real resizing!
The part we care about is the “space in use” section. This tells us approximately how big our backup file will be.
Provided your new empty USB partition is bigger than this, we proceed to backup the installation. If not, you’ll either need a bigger USB stick, another Linux host on the network (such as a second fit-PC2), or to delete some unnecessary files from your fit-PC2.
Note: If you are not routinely saving files to a network file server, this whole approach is not really suitable for you.
Step 8. Backup onto the USB drive
Change directory to the backup drive:
cd /backups/usb
Make a new directory to store the backup, and change to it:
mkdir initial_backup
cd initial_backup
Backup the Master Boot Record:
dd if=/dev/sda bs=512 count=1 of=sda.mbr
Backup the Windows partition(s):
ntfsclone –save-image –output – /dev/sda1 |gzip -c >sda_part1.img.gz
Note: If you are using Windows 7, you’ll need to repeat for all NTFS partitions. This example is for Windows XP, which only has a single partition.
While this is running, go make yourself a cuppa, it could take a little while.
Once it is done, you will have a current backup of your system on the USB stick that you can go back to when and if required. Note however that restoring from the backup will permanently destroy any changes made since the backup was done. Sometimes this is a good thing, other times, not so much…
The remaining steps are optional, but useful.
Step 9. Resize the NTFS (Windows filesystem)
Having determined in Step 7 how much space is in use, make an estimate of how much you will want for future growth. In our case, I double it, and add a bit to make it 12GB.
Resize the filesystem to the new size:
First the test run:
ntfsresize /dev/sda1 –no-action –size 12G
Then if all goes well (i.e. you don’t get any error messages from the test run), the real deal:
ntfsresize /dev/sda1 –size 12G
Step 10. Resize the partition
This is actually the most dangerous part, but less so because we have a current backup (that we created in Step 8).
fdisk /dev/sda
“d” to delete
“1” to select partition 1
“n” to create a new partition
“p” for primary
“1” for partition 1 (start with default cylinder offered)
“+12000M” for size, or if you’re not sure, add a little
“a” to add a bootable flag (partition 1)
“t” to change partition type, select type “7” HPFS/NTFS
“w” to write the changes
Step 11. Boot into Windows
Shutdown Linux with the command:
halt
Then remove the USB drive and start the fit-PC2 again. Windows will automatically run CHKDSK and verify that the resizing process worked correctly. When it has finished, it will restart Windows again, and you should see your normal Windows startup, but you may also get a message saying that Windows has found and installed your new hardware (the “new” disk).
If you managed to get back into Windows successfully, all has gone well.
Step 12. Boot into Linux and create a new partition on your computer
Shut down Windows, re-insert the USB drive, and restart the machine.
Login to Linux, then type:
mkfs.ext2 /dev/sda2
mount -a
You might notice this step is very similar to Step 6. With the exception of the disk involved, it is the same.
The new partition is now available in the /backups/hdd directory.
Step 13. Backup your system to the second partition
This step can be repeated as often as you wish to give you peace of mind. We suggest weekly, fortnightly or monthly. Unless you add and remove a lot of software, daily is a bit over the top,
but hey, who are we to dictate paranoia…
If you haven’t done so already (i.e. in Step 12), boot Linux and login.
Change to your backups directory, and make a new sub-directory with a meaningful name. We suggest the date, for example:
cd /backups/hdd
mkdir 20110720
cd 20110720
Backup the Master Boot Record:
dd if=/dev/sda bs=512 count=1 of=sda.mbr
Backup the Windows partition:
ntfsclone –save-image –output – /dev/sda1 |gzip -c >sda_part1.img.gz
Once this command completes, you have a current backup on the second partition of the hard disk. This will protect you from software failure.
If you also wish to protect yourself from hardware failure, we suggest copying this backup to your USB drive also:
cp sda* ../usb/.
Note: Since space is limited on the USB drive, you will not be able to keep as many copies there, but a recent backup is always a good idea.
You may now shutdown the machine:
halt
Remove the USB drive and restart Windows.
Step 14. Restore from a backup
Hopefully you will never need this step, but in the event you do, here’s how you restore your fit-PC2 from a backup.
Insert the USB drive and boot into Linux, then login.
Change directory to your backups:
cd /backups/hdd
This will access a backup stored on your Linux partition, used in the event of software failure.
If your hard drive has failed, change to the backups directory on your USB stick instead:
cd /backups/usb
Then change to a recent backup directory. Depending on why you need to restore, the most recent one may or may not be the best one, but it is a good place to start:
cd 20110720
Then, restore the master boot record (not always necessary, but it can’t really hurt):
dd if=sda.mbr of=/dev/sda bs=512 count=1
fdisk /dev/sda
“w” to write the new partition table
Restore the Windows partition:
Warning: This will destroy all existing data on the Windows partition.
gunzip -c sda_part1.img.gz |ntfsclone –restore-image –overwrite /dev/sda1 –
Now shutdown Linux:
halt
Remove the USB key and restart Windows. Your machine has now been restored.
Congratulations!
Want more great articles like this?
Sign up for email updates and get them delivered straight to your inbox.
We'll also donate $5 to Voyage Linux, to support the ongoing development of this fantastic software.
Sign me up!


